|
Website: http://www.truevalue.com
Level of difficulty: All Levels

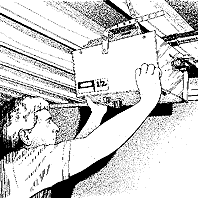
You can't beat the convenience of a garage door opener. It is easy to install yourself in an afternoon and today's units are equipped with sensors
that detect obstructions so they are child-safe. Chain-drive units are the most common. Screw-drive openers, which are more costly, are quieter and generally
more reliable. Installation varies only a little for the two types and from one brand to another. Detailed step-by-step instructions are always included
and there's usually a toll-free number to call if you get stumped or need help troubleshooting a problem.
The door should operate properly before you install an opener because undue strain can ruin or shorten the life of your new opener. Adjust tracks, clean
the tracks and rollers; lubricate roller bearings (not the tracks, which causes dirt buildup); and test for proper counterbalance. Don't adjust or replace
tension springs (one above each track) without the instructions supplied in an owner's manual or without the proper replacement parts. Don't service a torsion
spring (a spring above the door opening) system. These can be very dangerous and are best handled by a professional.
Before You Begin: You'll need a GFCI-protected receptacle in the ceiling adjacent to the power unit. Hire an electrician or, if you are comfortable with
basic wiring, extend power from an existing un-switched outlet or junction box. If your ceiling is closed, use a surface wiring system. Empty the garage
bay and lay out all the parts and tools on a worktable. If you have a long table, you can assemble the unit on it; otherwise, lay out a drop cloth and assemble
it on the floor. Remove all ropes on the door and either make all locks inoperative or (better) remove them.
Test door balance by raising door to midpoint and releasing it. It should stay put. As it is either raised or lowered another foot or so, it should open
or close slowly.
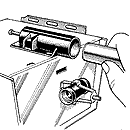 1. Assemble Opener
Assemble the head tube or rail sections. (Some snap together; others require fasteners.) Make sure that the traveler is installed on one of the
sections and any end cap is in place. You may also need to assemble a pulley on the idler assembly at one end. Then secure the other end to the
power unit (left). |
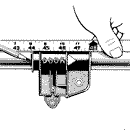 2. Locate Traveler
Position the traveler along the header tube or track the correct distance from the power unit according to the instructions. Measurements will vary
according to the type of door you have, tracked or trackless, and the opener model. |
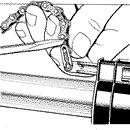 3. Attach Chain to Traveler
Secure one end of the chain to the power-unit-side traveler carrier using a master chain link: Assemble the two links over the chain and traveler;
and push the retaining clip over the protruding link shafts with a screwdriver to lock it into the grooves on the end of the shafts. Then wrap the
chain around the power unit drive sprocket. |
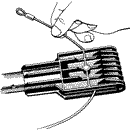 4. Attach Cable to Traveler
Attach the end of the chain to the looped end of the cable with a second master link just as done above. Then feed the cable through the opening
in the idler assembly, over the pulley, and back toward the traveler. Attach this looped end of the cable to the door-side traveler carrier with
a third master link assembly. |
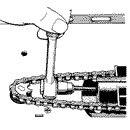 5. Adjust Chain/Cable Tension
To tighten the chain/cable loop, turn the tension chain/cable adjustment screw clockwise with a socket wrench or other tool appropriate for the
fastener. The chain should be nearly taut with only about 1/2-inch sag at its midpoint. |
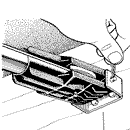 6. Attach Unit to Header
Locate the door center and draw a plumb centerline on the header above the door with a short level. Open the door to measure the distance from the
floor to its high point. Then, measuring from the floor to the plumb line and adding the allowance prescribed for your door type, mark for and install
the header bracket. With the power unit on the floor, raise the track/rod to attach the end in the header bracket. |
Step 7. Locate Power Unit
Guiding the opener assembly, raise the door fully open so the opener rests on top of it. Add a spacer between the door and unit to level the track
using a spirit level. To locate the unit: Slide it from side-to-side until the measurements from a center point on the unit to an identical point
on either side of the door are the same. |
8. Attach Power Unit
Attach mounting straps to the power unit. With an open ceiling, attach mounting straps/bracket to a joist or to blocking nailed between two joists.
With a closed ceiling, attach a mounting board across the ceiling first with screws; then attach the straps to it. Check that header rod/bar is
still level, and adjust straps if required. |
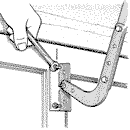 9. Attach to Door
Attach the door bracket to the L bar, and the L bar to the straight bar. Then pull the emergency release on the traveler and slide the traveler
to the door. Next, attach the straight bar to the traveler with the clevis pin or other fastener provided. Finally, locate, drill pilot holes for,
and fasten the bracket to the door as instructed. |
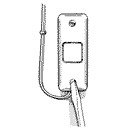 10. Install Manual Control
Attach the manual button switch at a convenient location near an entry door but out of reach of young children. Run the low-voltage wires up the
wall and across the ceiling, stapling them to the surface every couple of feet, being careful not to damage the wire insulation. |
Step 11. Install Switches & Sensors
With some units, position the open- and close-limit switches along the traveler rail/rod and connect wires at the power unit. Install obstruction
sensors, one on each side of the doors, at the same height and no more than 6 inches above the floor. Run the wires, stapled next to trim or wherever
they are best protected, to the power unit where they plug in. |
 Tip:
Tip:
Mount the receiving sensor on the side least likely to have direct sunlight on it. |
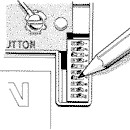 12. Set Up Remote
The remote control is set up so only it activates the opener. On some models, there are dip switches on both remote and power units that must be
set to any identical set of positions. On other more sophisticated units, the setup is done automatically and a different code is randomly activated
every time you use the remote. |
 Tip:
Tip:
No door opener installation is complete without final adjustments to the open- and close-force controls and obstruction sensors. Be sure to test
the door's operation according to installation instructions. |
Tools And Materials:
- Adjustable wrench screwdriver
- Step ladder
- Tape measure and pencil
- Short spirit level
- Drill and drill bits
- Socket wrench set
|
Note: This article was submitted by a second party and the contents are subject to our disclaimer.
|


